How to Cut a 45 Degree Angle Without a Miter Saw
Making angled cuts without power tools may be a bit cumbersome, but they are possible. If you don’t have a miter saw and want to learn how to cut a 45 degree angle without a miter saw, then you are precisely in the right place.
In this article, I have explained the cutting process as easy as I could. I hope after reading this article, you won’t have any issues while making a 45 degree angled cut without a miter saw.
I am sure you must be excited; therefore, let’s not waste any more time and jump straight to the tutorial.
Before we start learning how to cut a 45 degree angle without a miter saw, you will need a few things for the project.
So before starting the project, you need to have the following items as they will have you finish the job efficiently and professionally.
Things You Will Need to Make a 45 Degree Angle Without Miter Saw
Here is a list of items required for cutting miter angles.
- Miter Box (Makes things much easier)
- A sharp woodworking pencil (Must)
- Protractor (Required, but we can still work without it)
- A hand saw (Must)
- A compass (Completely optional)
How to Cut a 45 Degree Angle Without a Miter Saw (Using Miter Box)
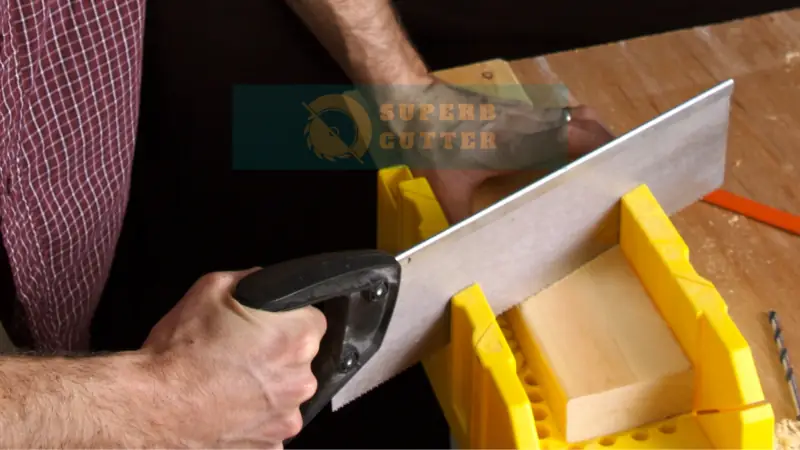
We will start learning how to cut trim at a 45 degree angle without a miter saw using a miter box. It is probably one of the most basic and most straightforward methods that almost everyone can follow.
While following this technique, you will need to have a miter box. You can make one for yourself if you don’t have one. However, there are some decent miter boxes available on different online stores such as amazon.
Step 1 Put the trim or any other workpiece inside the miter box with the finish side facing up.
Step 2 Guide your hand saw using the grooves on the miter box at a 45 degree angle.
Step 3 Start cutting the piece but make sure to let the miter box saw do its job without applying too much pressure.
Step 4 Remove the workpiece and repeat the process for another one
It will help you make those clean 45 degree angled cuts in no time. It is the most basic way to make miter cuts. However, some projects may require a bit bigger and broader workpieces at a 45 degree angle.
Due to the larger size of the workpiece, you may not be able to use your miter box. Under such conditions, you will need to use an alternate method for making 45 degree cuts. If you want to learn cutting miter angles without using a miter saw or miter box, follow the below methods.
How to Cut 45 Degree Angles Using Circular Saw

If you are working on a project let’s say you want to cut trim at 45 degree angles. But you don’t have either a miter saw or a miter box. If you have a circular saw then don’t worry as you can use it for the project too.
Cutting trim at 45 degrees with a circular saw might seem a bit challenging. However, these power tools can do almost anything but require the proper skill to use them. Let’s see how we can cut trim or molding at 45 degrees with a circular saw.
Before you actually start cutting the board, the first thing that I highly recommend is checking the board. You need to make sure it is perfectly squared and has minimum crooked points.
If the board is crooked then you need to be very careful because it may cause errors in the end result.
Once you have confirmed that the board is straight and you can easily cut it with no difficulty, then proceed to the cutting phase.
The first thing you need to do is to take your speed square and put it right on top of the wood. Take out your pencil and mark the exact spot that you want to cut.
Be very careful while marking the wood because even a slight bit of mistake can ruin the project.
Next, you need to take your circular saw and start cutting the wood carefully. Make sure you have mounted a fine-toothed blade otherwise the result will not be fine. You need to be very careful not only about the accuracy of the job but about safety as well.
It is because just like miter saws, circular saws can also kickback if you aren’t using the right saw blade.
If you are standing right behind it then chances are you will hit yourself in the leg which hurts really bad.
The best thing about circular saws is that they can help you not only cut the wood at 45 degree but 90 degree as well. This is one of the major factor that makes them a bit versatile power tool as compared to miter saws.
Cutting Mitered Corners Without a Miter Saw (using Protractors)
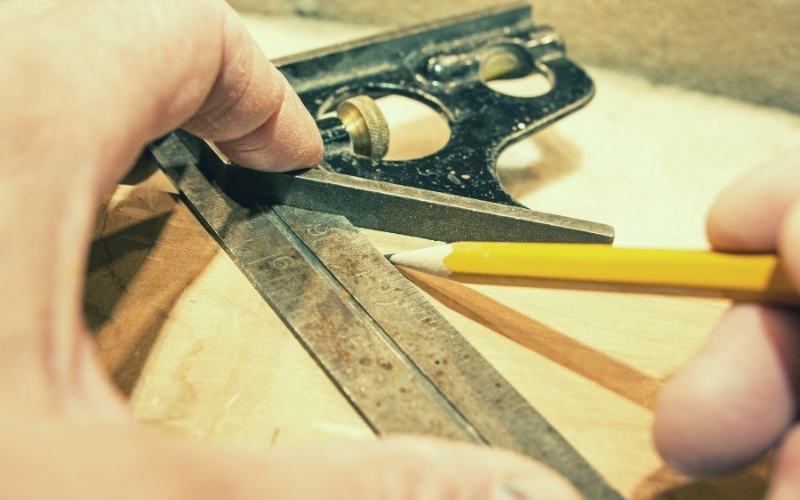
Just as I mentioned earlier, sometimes the workpiece can be too large for a regular miter box. Therefore, you will need to use alternate methods for making the 45 degree cuts. Here is a quicker way to finish the job with higher efficiency.
For this method, you will need a sharp woodworking pencil and a protractor. Protractors are geometry tools that have different angles printed on them. In order to make a clean miter cut, you will need to follow the below method.
- Place the protractor on the workpiece carefully.
- Use your pencil to mark the 45 degree angle.
- Make a cut mark with your handsaw.
- Follow the mark and keep cutting until you get that nice mitered edge.
This method is slightly advanced than the previous one. Since you are not going to use the miter box and there won’t be any guide except the line, the chance of error increases.
With that said, you will need to be extra careful during the whole project to finish it with clarity.
It is still an easy way to finish the project without a miter saw. However, if you don’t own a protractor and still want to make mitered cuts without a miter saw, let me teach you another method.
45 Degree Angle Cut Without a Miter Saw (using Folded Paper Method)
If you don’t have a miter box or a protractor but still want to make miter cuts, there is another technique. This method is also a bit advanced, but the best thing is you won’t have to waste your time doing calculations.

While cutting a 45 degree angle without a miter saw or any other powered tool, we will need a piece of paper.
Yes, you hear me right; you will need a piece of paper to assist yourself and finish the job professionally.
Here is how you can use that piece of paper to mark a 45 degree angle on your workpiece and make that cut.
- Grabe one edge of the paper and bring it to its opposite corner
- Once you do it, you will have a triangular shape in front of you.
- Turn the triangle upside down.
- Put it on the workpiece that you want to cut at 45 degree.
- Use your sharp pencil and draw a line using the paper as your guide.
- You can tape the paper on the workpiece if you want
- Use your hand saw to cut the piece and get a mitered edge.
After following the technique mentioned above, you will get your desired angle without any issue. If you are worried about the job’s perfection, don’t worry because a piece of paper always gives 45 degrees when folded.
However, you will need to carefully finish the job because a slight mistake can ruin the project. Apart from that, If you have a lot of time and want to try something unique, you can make a template for yourself.
Measuring and Making a Miter Angle Template (using a Compass)
Before even reading this method, I want to tell you that this is entirely optional and will require a bit of effort and maths to make the template. However, this method ensures an insane level of accuracy provided that you have mastered the art of using a hand saw.
In this method, we will be using a compass to make a template first. After making a template, we will paste it on the workpiece and start the project.
Here is a step-by-step tutorial on how to cut a 45 degree angle without a miter saw (using a compass).
- Take your compass (equipped with a pencil) and make an arc on a piece of paper.
- Put the needle of the compass on one side of the arc and draw an intersect.
- Put the needle in the middle of an intersection and draw another intersect
- Using these two intersections, draw a 90 degree angle
- Bisect the 90 degree angle to get a 45 degree
- Erase all unwanted lines and only leave the 45-degree angle
- Use this as a template and cut the trim, baseboard, or any other workpiece.
I know this may be a little bit complicated, but this method was a bonus. Besides that, you can use other tools to cut 45-degree angles.
All you need to do is be creative and use the tools around you to finish the project.
Safty Tips to Follow
Before you start working on the project you need to follow some safety rules. By following these rules, you will be able to complete the job more quickly and safely.
Here are some safety measure you need to take before starting the project.
- Always wear woodworking gloves before using any tool
- Make sure you are wearing proper safety gear
- Ensure your calculations twice before you cut the piece
- Always make sure you are using your tools in the right way
- Always ensure you have installed the right blade
- Make sure to secure the sharp tools such as saws, chisels etc away from yourself when not using to prevent injuries
How to Cut 45 Degree Angles
As mentioned above there are some methods through which you can make 45 degree cuts in wood without the use of a power saw. However, it will take longer to master this art if you are not used to hand saw or any other manual tools.
Using a hand saw will require a lot of practice and skill to follow the exact cutting line. This cutting line is made in the beginning right after the measurements to ensure precision. Apart from that, you should always practice on scrap wood.
You shouldn’t start cutting the baseboard corners directly for example if you have been assigned a task to cut baseboard corners. Why? because in the beginning, you will not be able to make precise cuts.
Why You Should Learn How to Cut 45 Degree Angles?
Being a skilled woodworker doesn’t mean you should only know how to use different power tools. If you depend on more tools, then there will be times when things will get harder for you. For example, your tools can get damaged. Under such conditions, you will need to rely fully on your hand skills to finish the project at full speed.
Apart from that, below are some of the places where you will need this skill:
Crown Molding
Crown molding is of the most advanced woodworking tasks that require a lot of care. If you are not a skilled person then you should always use a miter box or something for making bevel cut or compound miter cut.
It is simply because the crown molding is a very delicate job and requires a high level of precision. Even a slight millimeter level can make your cutting point not fit perfectly.
Baseboard Corners
The next thing where 45-degree cuts can help you is when you are about to cut baseboard corners. This is another hectic job and requires an ultimate level of precision. I highly recommend using a carpenter’s square along with a tape measure for accurate measurements.
Apart from that, if you don’t have an electric miter saw, you can always use a manual miter box for the cutting process. Once you have the desired pieces you can use wood screws or wood glue to join the baseboard securely.
Frequently Asked Questions and Answers
How do you cut a 45 degree angle by hand?
Producing the 45-degree corners of the trim or molding without a miter saw is easy. All you need to do is to focus on your measurements first. The more carefully you measure your corners the better they will be after cutting them.
Once you have perfectly measured the wood, the next thing to do is to choose your tool. You can either use a power tool such as a table saw or a circular saw. Or you can use a manual tool such as a hand saw or a miter box. I have explained everything in detail in my article above.
How do you measure to cut 45?
Although I have shared various methods for 45-degree corners in my article. However, I will mention some of them here to answer the question directly and quickly.
To measure 45 degrees you can use the following techniques
- Using Speed square to measure the corner (the best way)
- Using the paper folding technique
- Using a miter saw
- Using a miter box
Last Minute Thoughts
Although I highly recommend getting proper tools for the job always. A miter saw will help you save time and do a lot of things in a much better way.
However, sometimes you may face some odd situations, such as your miter saw can stop working.
Or maybe you don’t have the right blade for the job, and you have to finish a project urgently. Under such conditions, every woodworker should know how to cut a 45 degree angle without a miter saw. In order to help you out, I wrote a detailed article on this topic.
I hope if you made it this far, you would have learned different techniques of cutting 45-degree miter angles. You should have a sound idea on making those nice and smooth corners now.
If you enjoyed reading this article, please don’t forget to pin it on your Pinterest profile.
If there is anything else, you want me to add, please let me know in the comments. I highly appreciate suggestions and constructive criticism because my goal is to make it super helpful.

